
A Complete Guide To Creating Pixel Art
Pixel art is a form of art that has stood the test of time. Originally beginning in the early days of video games that were limited to a very low resolution, they have continued to be a popular medium that is still used for games as it can be simple but striking and carries with them a wealth of nostalgia from older games. But while it’s simple to create, it’s difficult to master. Using such a limited resolution you have to make sure things are clear and obvious as smaller details can get lost and too much detail can be messy and difficult to read.
What is Pixel Art?
Pixel art is a form of art that is so low resolution that you can see the pixels that the image is made from. The idea is to create a similar feel to older video games but it’s not limited in the same way that older games were. They can be a higher resolution but still pixel art and will often have many more frames of animation when animated as games can handle much more these days. Using this blend of old-style with newer production values can create some of the prettiest games out there whilst not being anywhere near as time-intensive as a big 3D game.
How Should I Create My Pixel Art?
What Resolution / How Many Pixels Should I Use?
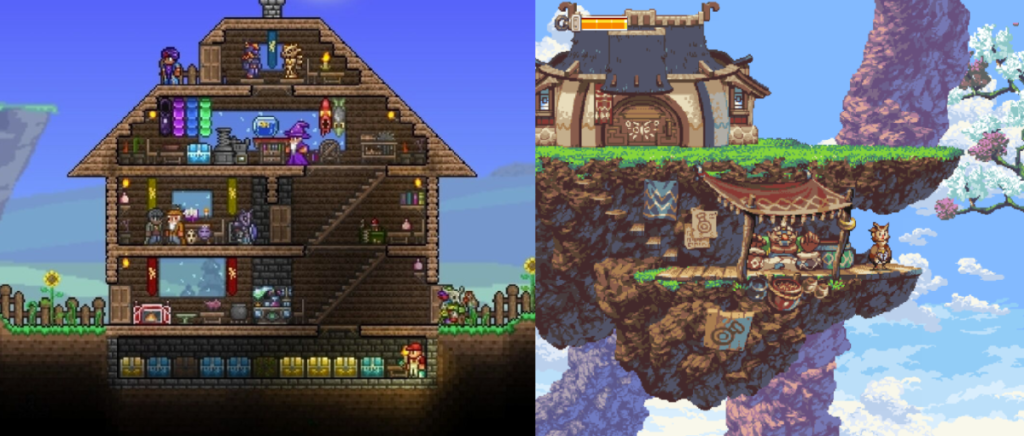
For it to be pixel art the pixels have to be visible, but their size can change quite drastically. On the lower end, you can have something like the original Mario games, or for a more modern version something like Terraria which uses relatively few pixels to create characters and environments. This kind of pixel art is generally easier to make but can make the art more difficult to interoperate. It will also be better for performance as it is a smaller image, which is why old games had to rely on this kind of art, although when it comes to 2D games, performance bottlenecks usually have more to do with programming than art these days.
On the other end of the spectrum are games that have a higher resolution pixel art, such as Owlboy or Crying Suns. These games will use higher resolution image to allow for much greater detail and gives it that distinctively modern pixel art style. A good artist will be able to shine using finer pixels to sell the art they are creating and in general this form of pixel art looks a lot nicer. This comes at the cost of requiring more artistic skill to get looking nice and longer production times to get those finer details locked in.
In terms of which you should go with it comes down to personal choice. Many teams that are primarily programmer-led prefer a more pixelated approach as they don’t have the skills in the team to work in finer detail and the art is an afterthought, with the focus being on finely tuned gameplay. Other games will have fairly basic gameplay but the art sells the product through immersion and beauty.
More Detail Or More Open To Interpretation
Besides just being about which type of pixel art looks better, they also serve different functions and require the player to think about them differently. higher resolution pixel art is the equivalent of your big AAA blockbuster games. They require minimal input from the user and focus more on the beauty and the spectacle of the experience.
Lower resolution pixel art asks more of the user. They have to ‘fill in the blanks’ to imagine what the pixel art is showing much more. This can be a good or a bad thing. On the one hand, the player has to put in more of the legwork when it comes to visualizing and imagining their world. This works for some but others will find it more of a barrier to entry. The payoff for this though is that players are able to fill in those blanks with how they want the game to look.
This can make the world feel more personal and appeal to people more, but it’s a fine line to walk to keep the visuals open to interpretation without either providing such a small amount to work with that it doesn’t get people’s imaginations working, or providing too much detail that there’s not much for the plater to interoperate.

What Programs Can I Use To Create Pixel Art?
Creating Pixel Art With Photoshop
The most common way to create pixel art, as it is with most 2D digital art forms, is using Photoshop or an equivalent program such as Procreate or GIMP. These programs are not specifically designed for pixel art but have such a wide variety of tools that they can be powerful ways to create it. You can create a canvas of any resolution that you want and either paint the pixels by hand or use other techniques such as scaling the image part way through production.
When using Photoshop and such, the process for creating pixel art will be similar to creating other forms of art. Hand-painted is the most usual approach with a focus on getting the most detail across in the smallest image. Other filters and such can be added but due to working at such a tiny scale, you will in most cases do the best working on each pixel individually by hand.
Using GIMP To Create Pixel Art
GIMP is a fantastic free program that attempts to provide what Photoshop does without the cost. Whilst it lacks many of the more advanced features of Photoshop, it covers the basics incredibly well. Normally the advice would be, if you are able to, to splash out and get Photoshop as it’s just a much more robust program and a great one to learn. However, if your intention is to just stick with pixel art then GIMP will give you all of the features you really need to do that without the cost.
PiskelApp
Piskel App is a great, browser-based pixel art creator. While there are a few out there, and many have similar features, PiskelApp stands out in the field as a robust pixel art creator with some features that others do not have, a key one being able to save frames for animation.
Most pixel art creation tools are focused on producing a single piece of pixel art, and if that is what you want then that’s fine. But if you want to create animation it will be a very time-intensive process to save each frame out one by one and then you will need another program to put them together into a sprite sheet. PiskelApp lets you do all this.
Pixlr
Pixlr is another browser-based art program but it’s not solely focused on creating basic low-resolution pixel art. This allows you to get a lot more style and a more unique look to your pixel art, but it also means it comes with a lot of features that you most likely won’t use, like with Photoshop. Whether this is a positive or a negative for you will be a personal choice and might come down to pixel art confidence.
Pixlr is free to use, but it does have a premium version meaning that not all the features are available to free users. The free version still has tools on par with the other pixel art creators, but if the thing that sells it to you is the advanced features then you will have to bear that in mind.
Pixelart
Pixelart is an online browser-based tool that you can use to create pixel art. Whilst it lacks some of the functionality of something like Photoshop, it’s a great tool for doing exactly what we want. Create pixel art. And it’s free as well! It has all the basic functionality you need such as setting the image size and the ability to use any colors that you need. There’s even a mobile app if you fancy some finger painting pixel art (or ideally using a stylus).
The simplicity of Pixelart translates to a simple art creation pipeline. You will be using tools like pencil, paintbrush, and eraser as well as shape tools like the line tool and circle tool to work in the shapes. After the art has been created you can save the file out locally and use them for whatever you like.
Creating Pixel Art With Dinopixel
Dinopixel is another browser-based pixel art creator and has many of the same features as Pixelart. It follows a similar standard format that programs like Photoshop popularized so which one you would most prefer to use will mostly come down to personal preference.
Dinopixel allows you to export these files, both at full size and reduced size, which can be useful for quickly downsizing your images, but you won’t know what the final image will look like until after you have exported it, so it might be a time-intensive process to keep exporting it to see how it looks and it might be better to start at a reduced size.
Pixel Art Techniques
Start Big And Scale Down
One technique that you could think about using is first generating the art at a higher resolution, much more like a normal painting, and then crushing the image down to a lower level that is more like traditional pixel art. The upside to working this way is that you are able to work around the limitations of pixel art and paint in a lot more detail into it initially. For this reason, it seems like a great way to generate pixel art.
However, the downside to this approach is that when the images get crushed down it loses a lot of detail. Besides wasting time doing work that won’t be seen, if the image gets crushed down too far it can also become indistinct. Those nice shaded folds in your character’s red cape might crush down to make a flat darker red cape with no real detail. For this reason, you have to be careful with this technique, especially when you are starting from a much bigger starting image.
Start Small And Scale Up
Another technique that might seem counterproductive at first, would be to start small and scale-up. The idea of this approach is to bypass the issue of scaling down where you lose detail. By starting small you will be forced the block out only the most important shapes and get the key information across. You can then add more of the finer detail each time you step up. This can be a good way of taking your pixel art to a more detailed level.
The downside to this is that you can easily mess up your pixel density and make the image not look unified. Each time you double the image size the pixel you had will be twice as big as any new pixels that you add, so each step up will require a pass over the entire asset. This could mean it takes more time than is needed, but some people find this technique useful to keep them from overcomplicating the image.
Keeping Pixel Density Unified Throughout
If you are creating a game or animation one thing you will want to bear in mind is the overall pixel density. To make the piece look unified and part of the same world you will want to ensure that all the elements look similarly pixelated. You can do this in a number of ways. In 3D you would use texel density which is a measure of how many pixels per meter. However, 2D games will often have more variable and less realistic ways of measuring distance.
If the engine or game uses world blocks or something equivalent you could ensure that each block is something like 24×24 pixels each. For games that don’t use that, you can use something like screen space to work out how much each object should be. Ensuring that each object within the world has the same pixel density will ensure similar quality throughout and tie it all together.
It may not seem like an important point if something is slightly higher quality than the things around it, but it can have a big impact on the overall look of the game, particularly if you have a scene made up of many different objects.

Pixel Animation
Animation is key for pixel art when making games or videos as it really brings the art to life. It can also be an amazing addition to any pixel art, even just an image that you have worked up, as it can make it so much more real and inviting. To do this you will need to generate a bunch of ‘frames’ which are individual images that when played together in order will make it look like the image is in motion.
How many frames and how small the movements between them are yet more stylistic choices. More frames mean a smoother and more modern-looking animation but it will be much more labor-intensive to produce all of those images. A good example of traditional animation styles with different frame counts is the Western animation style most obviously shown in Disney animations, which is traditionally animated at 24 frames a second, enough for smooth movement, compared to Japanese anime which is often animated within the 8-12 frames a second range, produced a much less smooth animation style that has to focus more on powerful keyframes. Each produces its own style and has different levels of work behind it, so use which works best for you.
If these animations are destined for games then you will need to render all of these frames out onto a sprite sheet with all of them laid out in a grid-like fashion. The game engine then needs to be told how wide and tall each frame is and then it will play through each in rapid succession when the animation is triggered, bringing your pixel art to life and showing off your amazing work.