
Face Weighted Vertex Normals And Normal Maps
There’s nothing in 3D that says high-quality asset than a perfectly smooth (or as close to it as possible) surface. The downside is, to achieve these looks tends to mean increasing the poly count of an asset to incredibly high levels, which is an obvious problem when thinking about the performance of a game, or even the performance of the program that you are running. And just applying a smooth finish to a model can cause a number of rendering issues that may not be obvious but can ruin the overall look of your model.
Normals have a variety of uses in 3D work and come in a number of varieties. The most common one that most of us will need to use is a Normal Map which is used to fake height by affecting the Normals on a surface which affects the way the light interacts with it. This is a key part of adding details to a surface that would be too fine to model in, such as pores on a character’s face. A lesser-known use for them can also be to smooth surfaces, by baking down from a higher poly mesh.
Finally, there are Vertex Normals, which many people won’t have touched. These are usually handled by the 3D program automatically and will respond to smoothing as you would expect, but they can be manipulated to make a mesh look higher poly than it actual is, by allowing each face to have its own Vertex Normal angles, or by merging those vertex angles into one.
How Normals Work
Although Normal Maps and Vertex Normals are handled very differently, they have similar names because they do a similar job. A Normal is what the computer uses to understand which way something is facing and as such, how it interacts with light. By default, a face has a Normal pointing perpendicular to it, showing that it should be most affected by light that is directly opposite it, and less so as it moves around to the sides. Each vertex also has a Normal for each face which will point in the same direction to start with.
If two faces are put side by side at a slight angle to one another they will have Vertex Normals facing in the same way as their respected poly faces. Even the vertices that are joined will have separate Vertex Normals for each face. This gives the hard-edged look.

When a mesh is told to smooth, it unifies these split Vertex Normals and averages them out. This allows the program to think of it more like a unified object when figuring out lighting and as such allows it to seem smooth. An important note, it does not make the silhouette of the object smooth as it does not change the geometry, it just fakes the effect to make it seem smoother.

Normal Maps work in a similar way but on a much more granular level. A Normal Map can change the normal angle on individual pixels. If you had a 1024×1024 Normal Map that was mapped 1:1 on a square poly then it will be controlling over a million Normals on that surface. This is what allows Normal Maps to fake height, smoothness, and other effects onto the surface of an object and why it’s capable of handling much finer detail than just a mesh.
Using Normal Maps To Smooth An Object
It might seem strange to use a Normal Map to smooth an object when the Vertex Normals are already there to handle it, but there are times when vertex normals won’t do the job. For example, if you take a cube and want it to have smooth, beveled edges, simply smoothing the cube will cause it to break.
The only way to achieve the look we want with Vertex Normals is to add more polys along each edge, to allow more finesse by having more of them to work with. By taking a higher poly mesh with smoothed-off corners and applying it to a low poly mesh without the added details, it’s possible to still fake that smoothed edge.
For more information on normal maps, check out our Texturing and Material article.
Face Weighted Vertex Normals
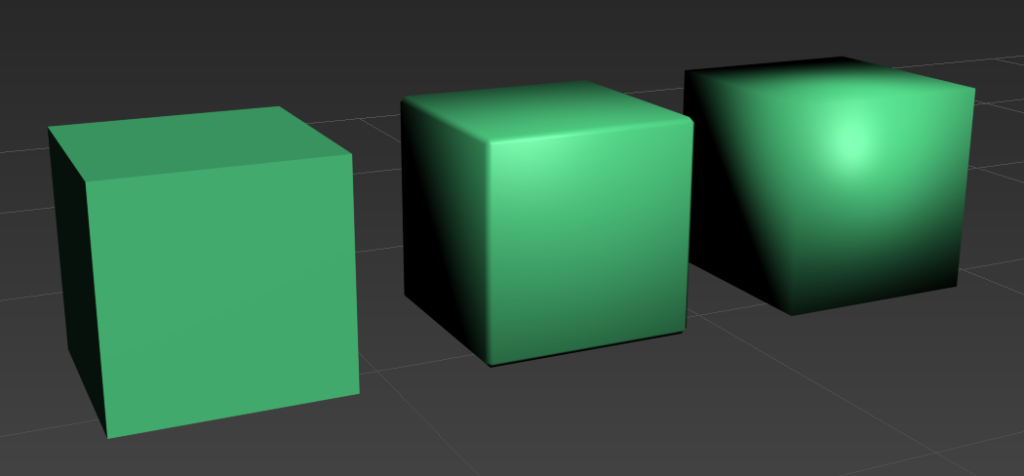
Some eagle-eyed readers might have realized that even in the above images of the cubes, the ‘correct’ center one that we are aiming for still has issues. It might not be immediately obvious to some, but a telltale sign is when a flat surface seems to have a light gradient on it. Whilst the edges should show smoothness, the sides of the face should still look flat.
The cube of the left has very solid colors for each side, as it knows the surface is supposed to be flat, but the smoothing of the beveled edges has confused the Vertex Normals on the middle one and is causing a gradient effect as it is inheriting some of the smoothing from the bevel.

When viewing the Vertex Normals of both beveled cubes, the differences are minor, but the effect can entirely change how the object is lit and can cause a large number of issues especially when working on more complicated assets. If you wanted to bake down a Normal Map onto an asset to reduce the polys, using the object with the normals fixed will give you the correct result.
As you can see in the image, the cube that we have fixed the Normals on looks very similar to the standard cube when looking at the Vertex Normals. This is telling the engine that the faces should be flat and not included in the smoothing process, only what is between these faces should be smoothed.
There’s a number of ways you can achieve this effect, including editing the Vertex Normal’s yourself. For this example, I used a free 3DS Max plugin that I’ve linked below.
Fixing Spiderwebbing On Flat Faces
This method of Face Weighted Vertex Normals can also be used to fix some of the dreaded spiderwebbing issues that persist when working on complex objects, particularly those that have been booleaned or are at an unusual angle. Here the small triangular polys can be seen catching the light differently from those around them despite making up part of the same flat face.
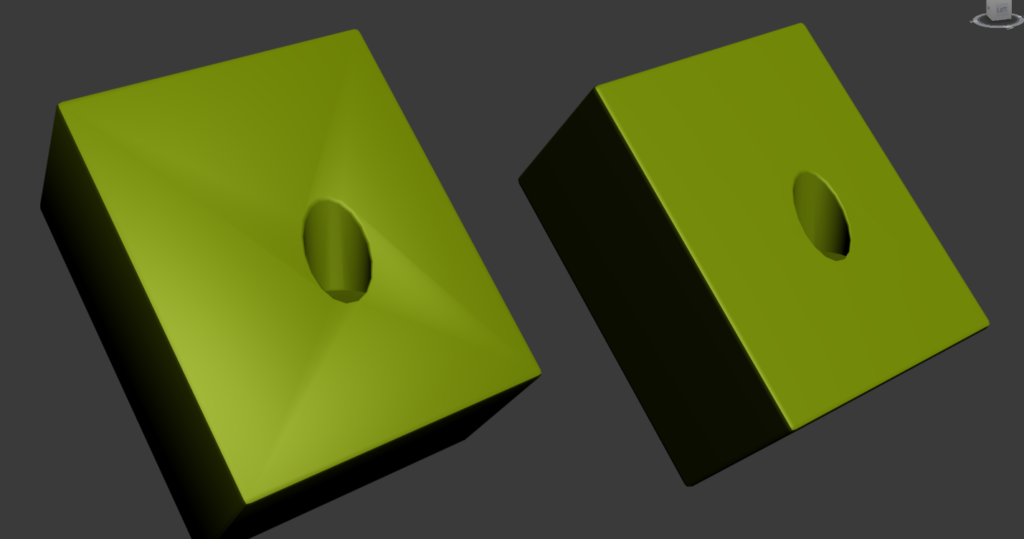
The issue here is that the individual triangles that make up the face are receiving different lighting information as it tries to account for the beveled edges of the cube and the edge of the hole. This is fixed in the same way as the cube above so that it vertex normals are being weighted towards the face of the cube rather than the smoothed edges.
Face Weighted Vertex Normal Plugins
Whilst this work can be done manually, and it’s best to really understand the fundamentals of how it works to get the best out of it, lots of people prefer to use a plugin that makes the job as simple as a single click.
There are plenty of plugins available for the various 3D programs, here are some of the more popular free ones for the main 3D game programs. If none of these are what you are looking for, there a plenty more out there that amazing Technical Artists have made available that you can find with a quick search.
3DS Max: wnormal – https://www.bytehazard.com/articles/wnormals.html
Maya: AMT Normal Tools Lite – https://fansub.gumroad.com/l/MayaFWVN#
Blender: Normal Editor – https://www.blend4web.com/en/community/article/131/
Further Reading
Hopefully this article has cleared up some of the confusion around this topic, but if you’d rather it be explained by someone else, or you’d like to dive deeper into the topic, here are some links to some great resources on the topic.
Weighted Vertex Normals – http://www.bytehazard.com/articles/vertnorm.html
A short explanation about custom vertex normals – https://polycount.com/discussion/154664/a-short-explanation-about-custom-vertex-normals-tutorial/p1
SHADING INTERPOLATION – https://web.archive.org/web/20160128060607/http://frostsoft.blogspot.com/2012/01/shading-interpolation-vertex-normals.html
For other guides on the fundamentals of 3D modeling, check out our article on Tiling Textures and Trim Sheets and our Guide to Texel Density.
